
ASA Quick Start Guide
Quick Start Guide:
ASA Filament
Overview
Acrylonitrile styrene acrylate (ASA) was developed in the 1960s as an improved alternative to Acrylonitrile butadiene styrene (ABS). Substituting the butadiene in ABS with acrylate, the resulting polymer exhibits the same valued properties of ABS (impact resistance, toughness, and rigidity) but with the added benefits of being 10x more UV resistant, a trait that makes it perfect for outdoor parts in the Australian sun. Additional benefits also include an increased chemical resistance to solvents and an increased heat resistance.
While the same 3D printing equipment is required to print ASA as ABS, (a heated bed and an enclosure) ASA tends to be more forgiving as it experiences decreased warping, making it more forgiving to print for beginners.
For more information on what ASA is and what it’s good for, check out our Introduction to ASA (Coming Soon).
Pros |
Cons |
|||||
|---|---|---|---|---|---|---|
| ✔️ | Highly UV and weather resistant | ❌ | Requires heated build plate & enclosure | |||
| ✔️ | High impact & heat resistant | ❌ | Produces odours while printing | |||
| ✔️ | Decreased warping compared to ABS | |||||
Hardware Requirements
|
Enclosure |
Heated Bed |
Hardened |
Fan |
|
|
|
|
|
| ✔️✔️ | ✔️✔️ | ❌ | ✔️✔️ |
|
Fume |
Direct |
High Temp |
Filament |
|
|
|
|
|
| ✔️✔️ | ❌ | ❌ | ✔️ |
Printing Settings
When printing in ASA, provided you have a heated bed and an enclosure for your 3D printer, use the following settings for best results:
Extruder Temperature
-↓ Extruder Temperature ↓ Stringing - Will decrease at temperatures <240°C as the molten filament will have a higher viscocity, leading to a neater print. ↓ Oozing - See above. ↑ Underextrusion - Can happen at temperatures of <230°C as your printer simply can't melt the filament fast enough to keep up with the filament feed rate. Our tip: Before adjusting your extruder temperature any lower than <230°C, try adjusting your retraction, coasting and travel speed. |
230°C-260°CSet your extruder temperature to 230°C. Increase the printing temperature if you are experiencing underextrusion or if your extruder gear is slipping. 🛈
|
+↑ Extruder Temperature ↓ Surface Resolution- At temperatures of <260°C leading to sloppy layers |
Bed Temperature
-↓ Bed Temperature ↓ Part Adhesion - Too little heat in the bed will cause your part to cool to quickly, curl and dislodge from the bed. |
100 - 120°CsSet your bed temperature to 100°C for your first layer to ensure your first layer sticks to the bed and 100°C for the rest of the print. 🛈
|
+↑ Bed Temperature ↑ Part Deformation - Too much heat will cause your part to melt into the bed, deforming the bottom layers. |
Fan Speed
-↓ Fan Speed ↑ Part Strength - Slows the cooling rate of each layer being printed. This gives the part more time to bond to the preceeding layer, resulting in increased interlayer adhesion and part strength. Helps remedy part delamination problems. ASA can be printed with fan speed set to 0%. ↓ Surface Resolution - Decreasing the fan speed will result in your ASA staying more molten for longer. This can result in sloppy layer lines. |
20-30%Start at 20% fan speed for a good balance between part strength and surface resolution 🛈
|
+↑ Fan Speed ↓ Part Strength - Increases the cooling rate of each layer being printed. This gives the part less time to bond to the preceeding layer, resulting in less interlayer adhesion and a decrease in part strength. |
Print Speed
-↓ Print Speed | ↑ Print Time ↑ Layer Adhesion - Gives your layers more time to bond, increasing interlayer adhesion. ↑ Part Deformation - Too much thermal energy may be pumped into your part, slowing down the cooling and resulting in sloppy layers ↓ Travel Speed | ↑ Print Time ↑ Stringing - More time spent travelling results in more molten material leaking out of the nozzle of your printer leading to more stringing |
30 - 50mm/sPrint Speed: Start at 50mm/s and only increase the print speed if you are comfortable with the print quality. Printing your first layer at 25mm/s will help keep your part stuck to the bed. 🛈
|
+↑ Print Speed | ↓ Print Time ↓ Layer Adhesion - Gives your layers less time to bond, decreasing interlayer adhesion. Aim to keep print speeds under 60mm/s for best results. ↑ Extruder Skipping - Can occur when the printer can't melt and print filament fast enough ↑ Travel Speed | ↓ Print Time ↓ Stringing - Less time spent travelling results in less molten material leaking out of the nozzle of your printer decreasing stringing |
Retraction Distance
-↓ Retraction Distance ↑ Stringing -Shorter retraction distances causes a smaller a drop in the pressure inside the nozzle. With distances less than 3mm, it may not be enough to stop molten filament from leaking out of your nozzle. ↓ Oozing - See above. |
3 - 6mmFor Bowden systems: Start with a retraction of 3mm. Increase retraction to 4mm if needed. This distance may be higher if you have a longer bowden tube. For Direct Drive systems: Start with a retraction of 1mm. Increase retraction distance to 2mm if needed. Our Tip: Tune retraction distance up/down by 0.5mm increments. Aim to keep the distance between the 0.5 - 6mm. 🛈
|
+↑ Retraction Distance ↓ Stringing - Causes a larger a drop in the pressure inside the nozzle, stopping more filament from leaking out of your nozzle. ↓ Oozing - See above. ↑ Underextrusion - Excessive retraction can cause a delay before your nozzle resumes printing causing underextrusion. Our tip: If your retraction distance is at the upper limit, try adjusting your retraction speed, coasting & travel speed. |
Retraction Speed
-↓ Retraction Distance ↑ Stringing - Lower retraction speeds cause a smaller drop in the pressure inside the nozzle which may not be enough to stop filament from leaking out of your nozzle. ↑ Oozing - See above. |
45mm/sStart with a retraction speed of 45mm/s. Our Tip: Increase retraction speed by 5mm/s increments until you notice diminishing in returns in stringing and oozing. 🛈
|
+↑ Retraction Speed ↓ Stringing - Causes a larger a drop in the pressure inside the nozzle, stopping more filament from leaking out of your nozzle. ↓ Oozing - See above. ↑ Filament Slip - Excessivly high retraction speeds can cause the feed gears to slip, causing extrusion problems. Our tip: If your retraction distance is at the upper limit, try adjusting your retraction speed, coasting & travel speed. |
|
The internet is filled with conflicting information regarding different settings. It’s critical to understand not all 3D printers are built the same. This makes giving exact recommendations for settings difficult as settings for one printer may not necessarily carry over to others. |
|---|
Best Practices
In order to print ASA successfully, having the correct the hardware setup and temperature settings outlined above are only half the battle. Here are some best practices to ensure reliable ASA prints.
+ Have the right equipment before starting.
If you haven't gathered by now, having both and heated build surface and an enclosure are a must when printing in ASA.
When compared with ABS, ASA experiences less shrinkage when cooling (0.7% versus 1.6% for ABS), but the problem is not entirely non-existent. For this reason, you'll want to ensure your printer is equipped with both to ensure your part stays warp-free and stuck to the bed.
+ Invest in a good build surface
When printing in ASA we recommend investing in textured print surfaces like our Ziflex or PEI Build Surfaces to assist in keeping your print anchored to the build plate.
In addition to helping to reduce warping on your printer, these upgrades will facilitate trouble-free part removal, extending the time between calibrations of the bed level.
+ Print with slow fan speeds
Decrease your fan speed to a speed of 20-30%, you will achieve an optimal balance between cooling and reducing warping and shrinkage.
+ Keep Your Filament Dry
ASA is a hygroscopic material meaning it will absorb moisture from the surrounding air. This absorbed moisture in the filament is not a problem once the part has been printed but does present a problem during printing and can result in a 3D printed part with:
- Weaker interlayer bonding
- Stringing and fine hairs developing on the print
- Poor surface resolution
As such, keep your filament stored in a dry environment with, like in an airtight bag or a box filled with desiccant packs. This should preserve the filament and prevent it from absorbing too much moisture.
If your filament is already wet, then you can dry it out with an oven set at around 60 °C. Leave the spool in the oven for a few hours while the moisture is cooked out.
For more in-detailed tips about filament storage check out our [Filament Storage & Handling Guide] (Coming Soon)3.
Pro Tips
+ Adjust One Setting At A Time
Dialling in your ASA print settings can be a little tricky and sometimes requires the manipulation of multiple settings to achieve the perfect result. Try tackling the settings tweaks using the tips outlined above in the following order adjusting one setting at a time.
- Printing Temperature
- Travel Speed
- Retraction
- Coasting
- Fan Speed
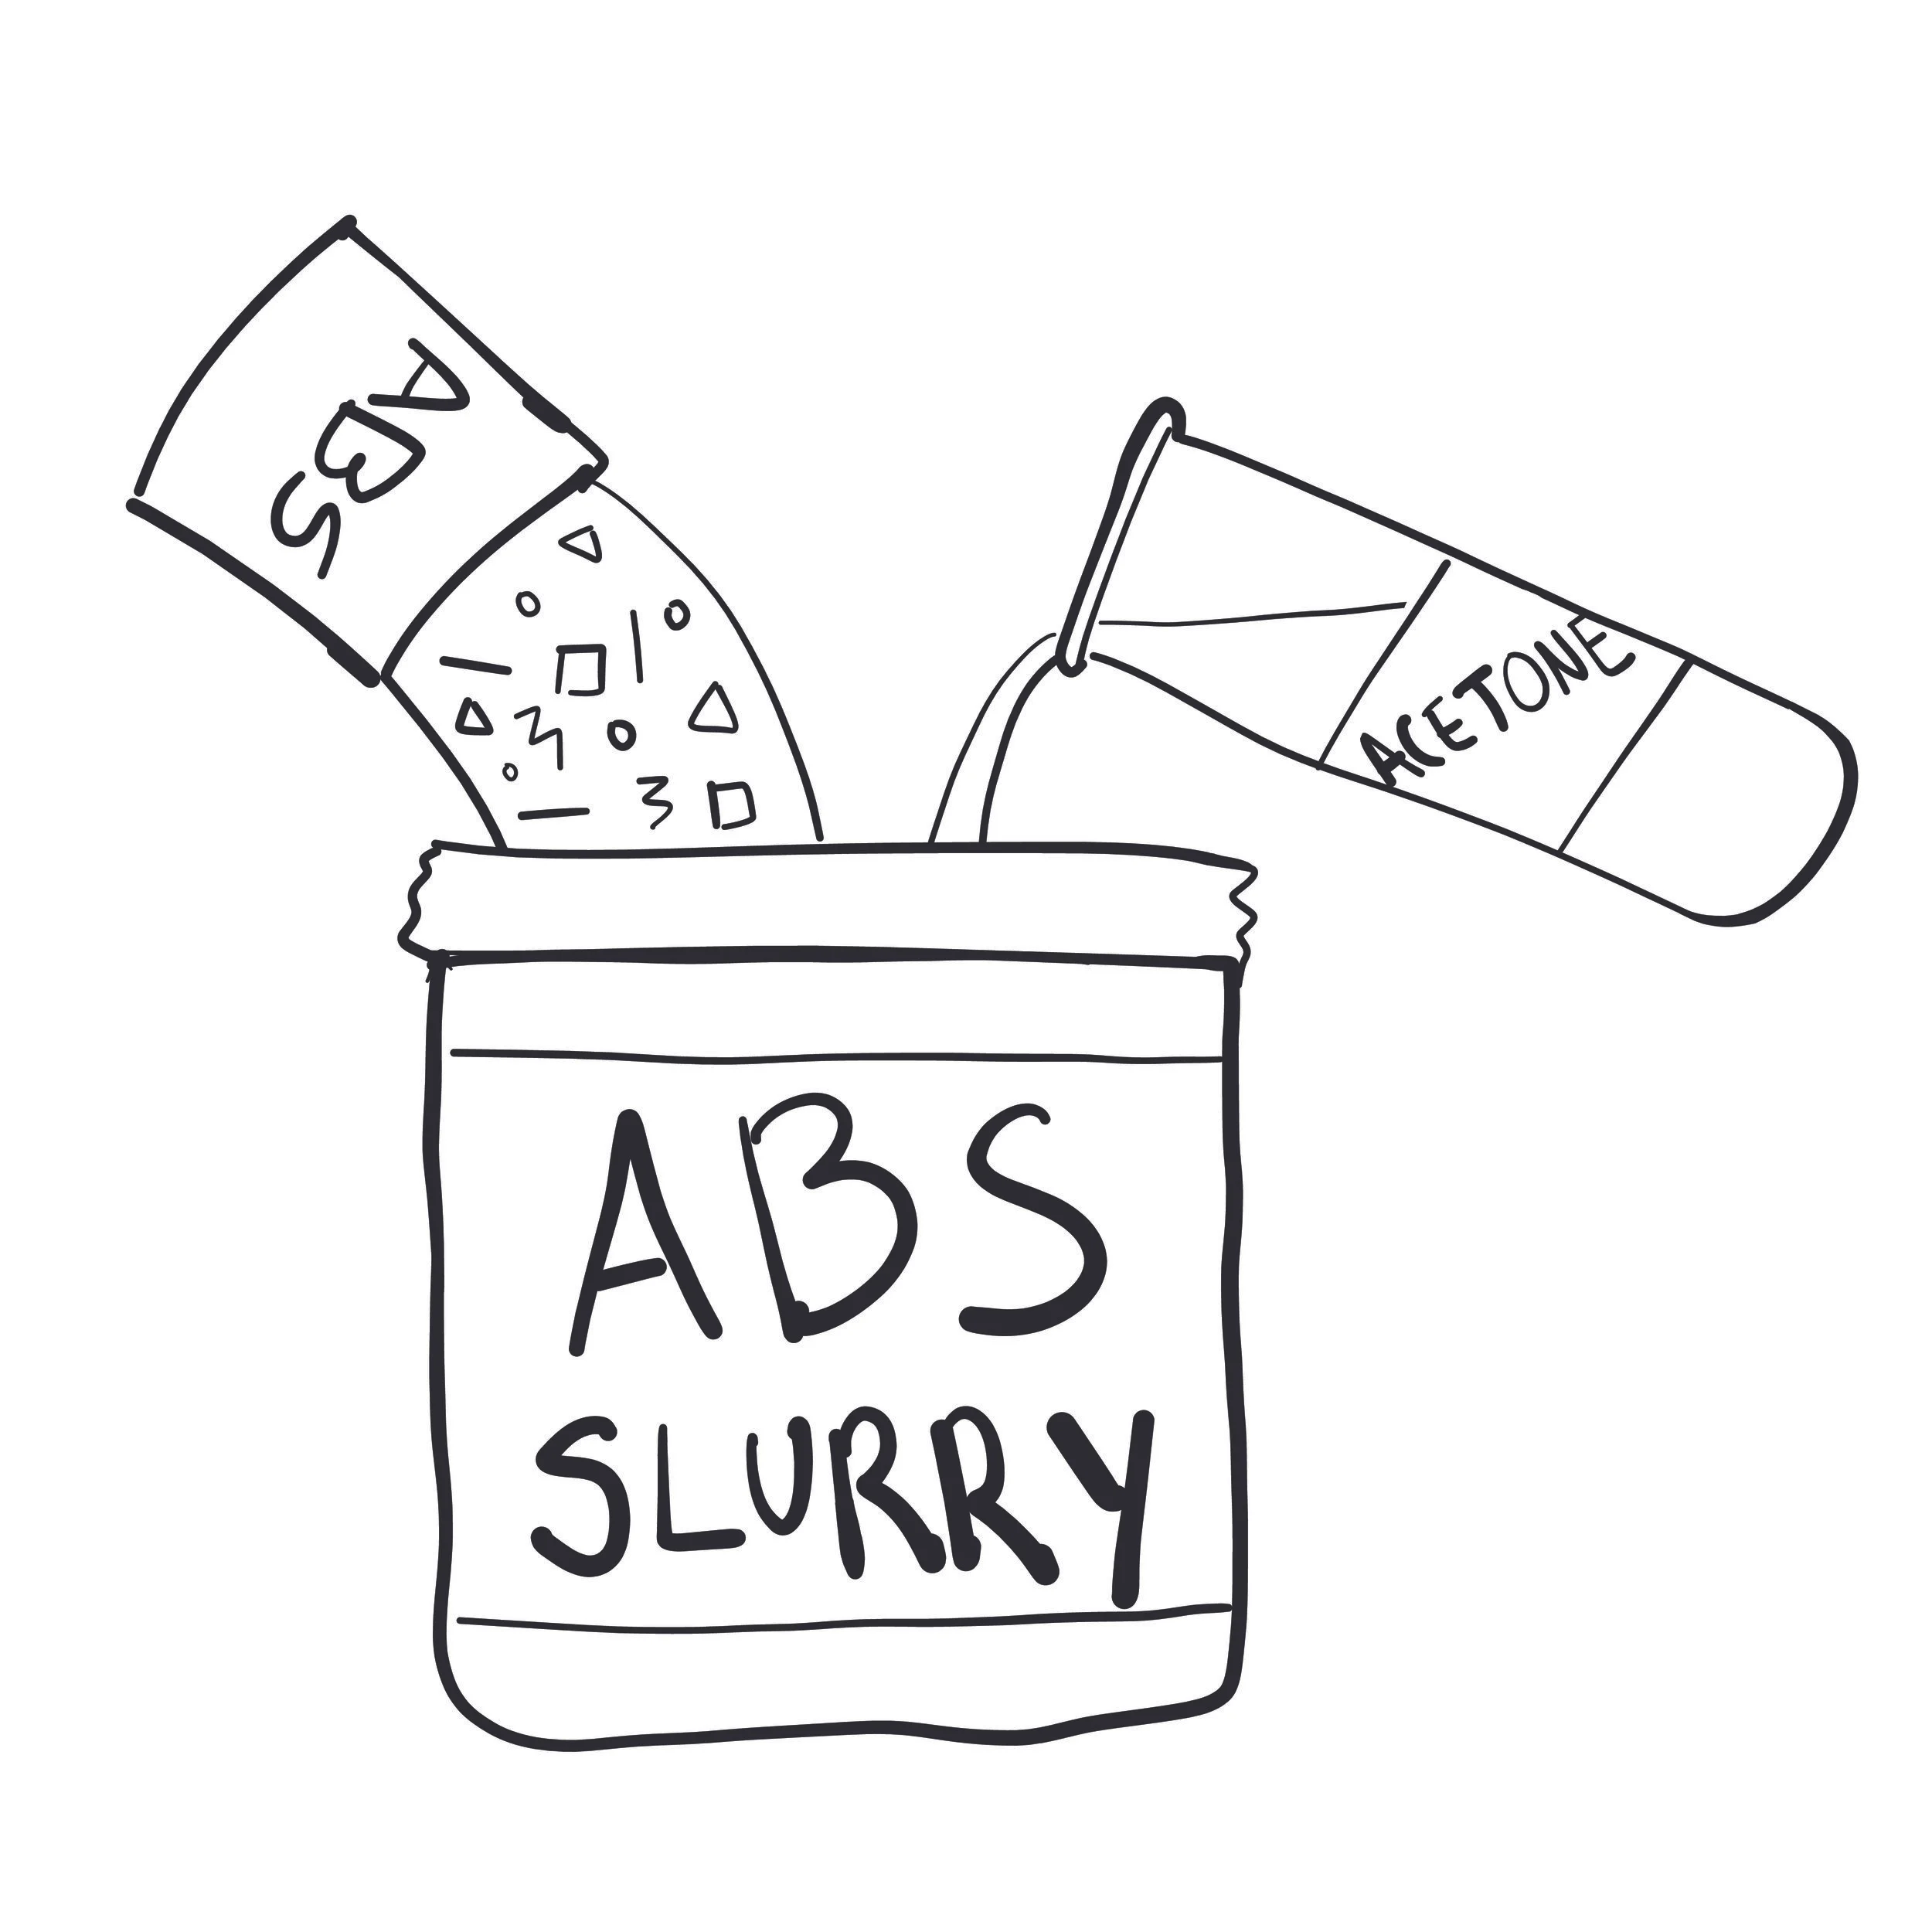
+ Adhesion Hack
- ABS & ASA Slurry If you are experiencing issues with adhesion, apply a thin layer of ABS or ASA slurry on top of a heated build plate just prior to printing when your heat bed has reached printing temperature.
- Disable Fan Try disabling your part cooling fan and printing 5-10°C for the first few layers of the print to keep the part stuck to the print bed.
+ Acetone Smoothing
As with ABS, ASA can be smoothed by exposure to acetone vapours, resulting in a glass like, gloss surface.
+ Dissolvable Supports
HIPS is a great dissolvable support option for ASA and can prove valuable for 3D prints with complex geometries or overhangs.
For a more in-detail look at the best practices when 3D printing in ASA, check out our next guide in this series ASA Filament Ultimate Printing Guide (Coming Soon).
Applications

Weather-Resistant Outdoor Parts

Outdoor Signage

Automotive Components
Related Guides


![The General Guide to 3D Printing [2021]](https://images.squarespace-cdn.com/content/v1/5731cadf7c65e4d72b3b98d1/1605047959391-2ZHXJ6OF7ZAOUX9N5RH2/16.jpg)
![PETG Ultimate Filament Printing Guide [2022]](https://images.squarespace-cdn.com/content/v1/5731cadf7c65e4d72b3b98d1/1583218701039-R9J9CVFDM740CNIN13V2/image-asset.jpeg)


What are the best settings for 3D printing in HIPS? Find out in our Quick Start Guide which contains the best settings AND explanations for printing in HIPS.