
How to join your 3D prints without glueing - 3D Printed Rivets
3D printed rivets can be used to join similar materials together
This happens via a process called friciton welding - all you’ll need is a rotary tool, drill and a 3D printer
Download your very own 3D printed rivets below.
The Humble 3D Printed Rivet
One of the oldest forms of mechanical fasteners still in operation today, the humble rivet has been used to secure stuff for ages. (The Bronze Age to be exact) In fact many of mankind’s greatest creations are held together by this little mechanical gem. The Sydney Harbour Bridge, airplanes, and no doubt the jeans that you are currently sitting in, owe their continued structural integrity to these little guys. Need something secured to another thing? Simply drill a hole in the two things and whack a rivet in. By deforming the other end of the rivet, the mechanical faster acts to secure the items together without the need for anything as uncouth as glue.
But what if you can’t access the other side of the objects to deform the head? Enter the blind rivet. Requiring access from only one side, the blind rivet allows the riveter, the same riveting, rivet-y action afforded by your average rivet, while only requiring access one side of the objects. This is achieved through a process called “friction welding” whereby the plastic rivet is spun using a rotary tool against the surface of the print. The friction results in the creation of heat in the areas where the plastics touch, causing them to melt and creating a “melt zone” and when allowed to cool, bonds the two plastics together.

Rivet
/ˈrɪvɪt/ • noun
1. A spinny doohicky used to join stuff together. Especially good for attaching spinny things to stationary what-nots.
This method of joining has two main benefits. The first being that the rivet can be made of the same plastic as the print you are riveting, this method results in a stronger, “chemical weld”, rather than a weaker bond offered by plastic glue or super-glue that merely cements the two by surface tension. Secondly, because the process of riveting mechanically sandwiches the two parts together (like a nail) riveting also allows you to secure a spinning print part to a stationary part by simply loosely fastening the head of the rivet, allowing a maker even more versatility when designing complex prints. Think wheels to a 3D printed car. Need to print something larger than your print bed allows? Use multiple rivets to construct massive models from flat panels.
Thanks to the fantastical properties of thermoplastics, you can now print your very own blind rivets to your heart’s content.
Interested?
Of course you are.
Download & Print
Before you go any further you’ll need to download and your 3D printed rivets. We’ve designed two different types of rivets that will come in handy. They are designed to be printed flat on the bed to optimise for part strength.
V2.0 - The Round Rivet
Designed to be printed with supports for external rivets that will be seen. Has a round collar.V3.0 - The Flat Rivet
Designed to be printed flat on the bed without supports. Designed to have a flat bottom for faster printing without supports. Collar is not fully round.
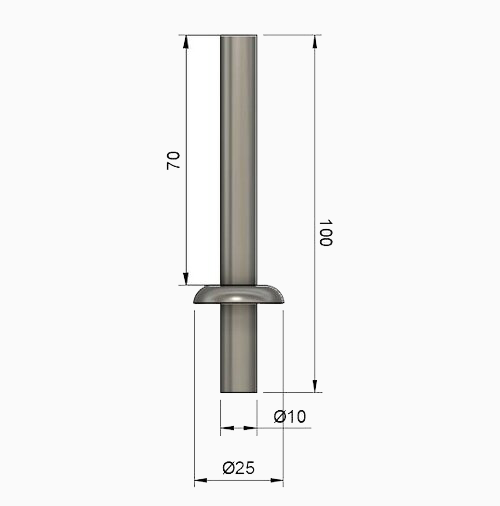
The Standard Print Co. 10mm Rivet
V2.0 - 10mm Round Rivet
V3.0 - 10mm Flat Rivet

Printing Settings
| Material | Same as material you wish to join |
| Infill | 100% |
| Supports | Yes |
| Rafts | No |
Printing Settings
| Material | Same as material you wish to join |
| Infill | 100% |
| Supports | No |
| Rafts | No |
Really Getting Into Riveting
1. Gather your tools
You will need:
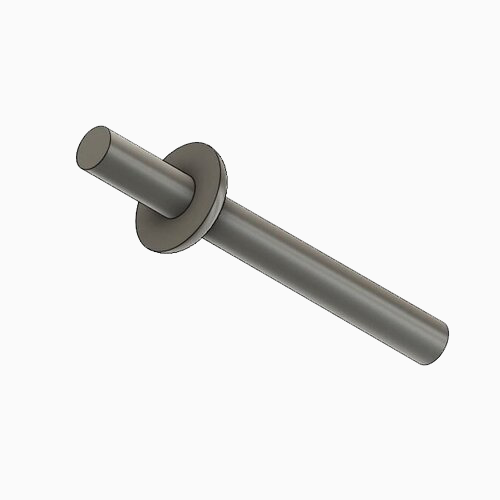
1 x Rivet Model 3D printed in the material of your choice (Flat or round)
1 x Pair of Pliers
1 x Handheld Rotary Tool
1 x Safety Goggles
1 x Heat Gun (Optional)
1 xNail (Optional)
*A handheld tool will allow better control and more accurate riveting but a drill will do. We used a Dremel Rotary Tool.
2. Print Your Rivets
Download Matt’s Friction Weld Blind Rivets design off Thingiverse and start printing. The design calls for the rivets to be printed laying down with the long thread running along the horizontal plane. Doing otherwise tends to produce rivets that break too easily upon the layer. Note the rivets are only “three quarters round” by design so as to save plastic and perform just as well as if they were perfectly cylindrical.
3. Prepare Yourself
Loosen the collet on your rotary tool and slide the rivet in (mandrel end first) before tightening the collet. Design or drill a 10mm mounting hole in the panel that is to be riveted. For best results, ensure the hole is larger in diameter than the shaft of the rivet while smaller than the head. If you need the hole to be larger than the diameter of the head, you will need to use a heat gun and a nail to melt and flatten the head of the rivet, but more on that later.
4. Weld
Time to start drilling. Spin up your rotary tool and gently insert the shaft of the rivet through the guiding hole until your rivet comes into contact with the surface of your print. (We recommend the rotary tool to be set at 10,000rpm) Keep the spinning rivet in contact with your print until the shaft of the rivet begins to melt and deform. If you have trouble keeping the rivet in place, drilling a shallow guiding hole in your print can help prevent your rivet from jumping. Once the desired bond has been achieved, stop the rotary tool and continue holding the rivet in place, perpendicular to your print until the plastic cools and you can feel the two pieces join. (Approximately 30 seconds) Using a flush cutter, snip off the mandrel, leaving the head intact for a clean looking rivet.
5. Clean up (Optional)
If the rivet head is too small to secure the print or has sharp edges, now is the time to use your heat gun to carefully melt the head of the rivet before pressing it flat with the head of a needle.